
Unit testing is a vital part of software development, focusing on testing the smallest units of code, such as functions and methods. When done correctly, unit tests serve as a safety net, ensuring that your code behaves as expected.
In this comprehensive guide, we’ll cover everything you need to know about writing unit tests for your Node.js Express API. By the end, you’ll have a solid understanding of how unit tests work, how to write them, and how they can help you quickly identify bugs.
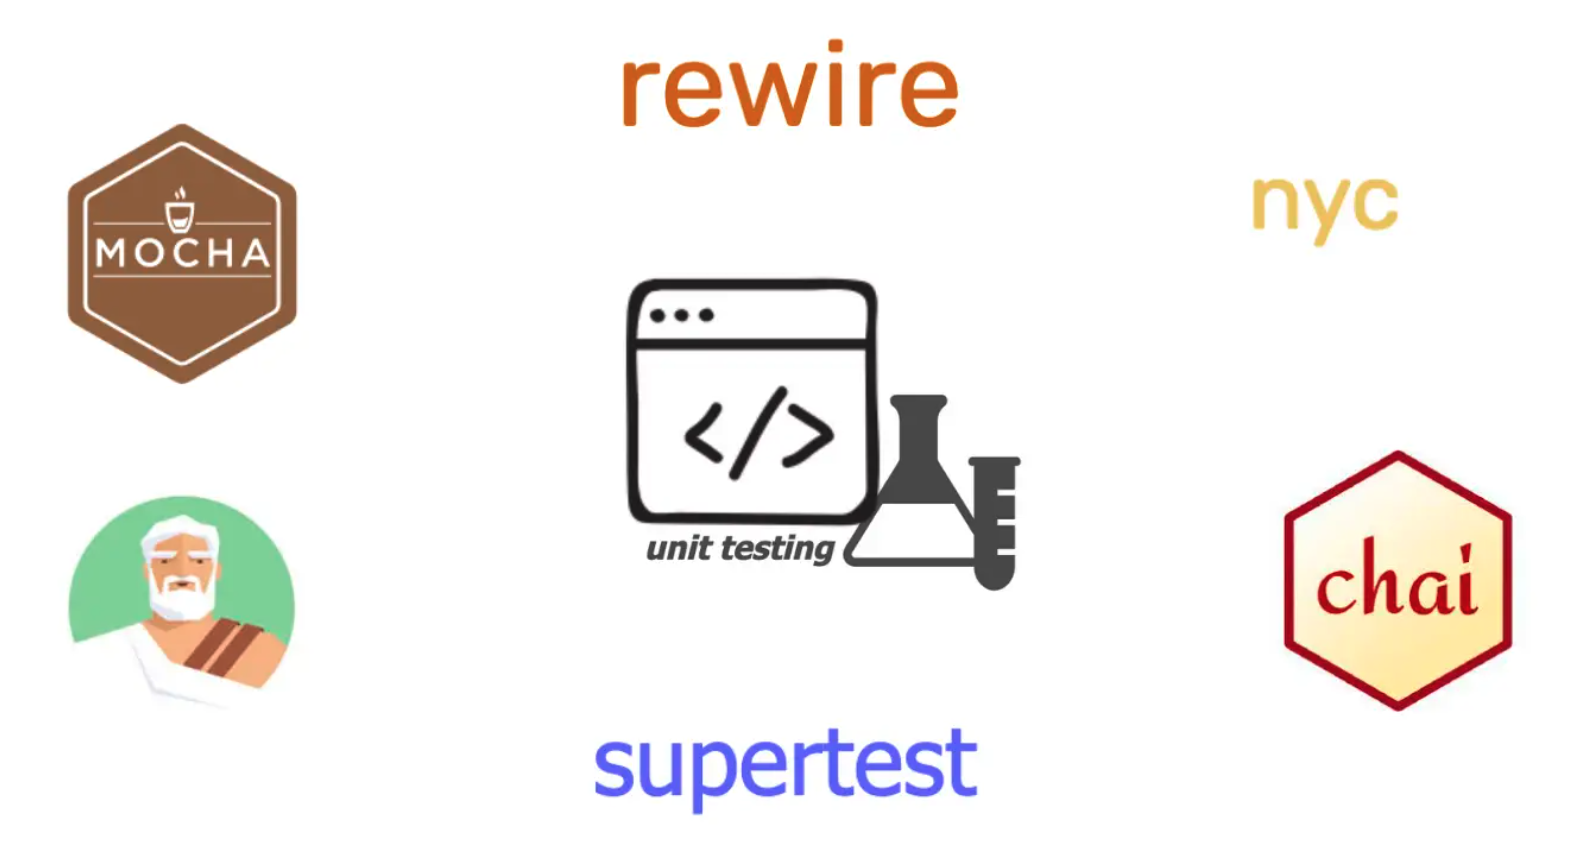
Table of Contents
- What is Unit Testing?
- Why is Unit Testing Important?
- Why Unit Tests Matter?
- Express API
- Getting Started with Testing
- Resources
- Drawbacks of Unit Testing
- Learn More
What is unit testing?
Unit testing involves testing individual components of your application in isolation. This isolation is crucial because web applications often interact with databases, external services, and file systems. Unit testing ensures each component functions correctly on its own.
While unit tests are essential, they only check individual parts of your application. To ensure all parts work together, you should follow unit testing with integration testing.
Why is unit testing important?
Unit tests are typically the first level of testing in web applications. For many projects, they might also be the last, as integration and end-to-end tests follow later. Writing unit tests early in the development process helps catch bugs before they escalate.
Why Unit Tests Matter?
Even though unit tests can't guarantee a fully functional web application on their own, they are crucial for several reasons:
-
Early Bug Detection: Unit tests catch bugs during development when integration or end-to-end tests aren't available.
-
Documentation: They provide valuable documentation for the codebase, making it easier to understand and maintain.
-
Setting Expectations: Following Test Driven Development (TDD) helps establish clear expectations for the code.
Getting Started
To get the most out of this guide, you only need a working Express API open in your preferred editor. If you do not have one, you can grab the sample Express.js API that we will be using throughout the article from here
Express API
We'll be using a simple express API to demonstarte unit testing throughout this article. I have prepared the starter code here. Please not it is a starter branch.
Currently, there are only these few endpoints in the API.
- GET /health/sync - returns 'OK' synchronously
- GET /health/async - returns 'OK' asynchronously
- GET /product - fetches all the products from MongoDB
- GET /product/:id - fetches the product that matches the provided id from MongoDB
- POST /product - creates a new product in MongoDB
- PUT /product/:id - updates the product with new values in MongoDB
Getting started with Testing
We are now ready to write some unit tests for our Node.js Express API. For this, we'll use Mocha and Chai. Mocha is an open-source testing framework that can be combined with various assertion libraries. It boasts great community support and is used by companies like Coursera, Asana, and Intuit. Chai, an assertion library, pairs well with Mocha to help us write expressive tests.
In our API, there are several components (or units) that we need to test:
-
Express Routes: Express routes map HTTP requests to the corresponding controllers and return responses to the client. Testing routes ensures that your API endpoints behave as expected and correctly handle incoming requests.
-
Controllers (or Services/Business Logic Handlers): Controllers are responsible for performing the business logic and returning the results. They are crucial units to test to ensure that your application logic is functioning correctly.
-
MongoDB Models (Database Schemas): MongoDB models define the structure and constraints of your data. Testing these models ensures that the data adheres to the defined schema and constraints are enforced at runtime.
We have now learn too much of theories and now it is time to start doing the actual technical work.
Installing mocha and chai
Let's get started by installing mocha and chai as a dev dependency
yarn add -D mocha chai
Once done, now let's create our first test.
Create our first test
Let's get started by first creating a test file. We will start by adding a test file for our /health/ API.
.
├── app.js
├── controllers
│   ├── health.controller.js
│   └── product.controller.js
├── models
│   └── Product.model.js
├── routes
│   ├── health.route.js
│   ├── index.js
│   └── product.route.js
+└── tests
+    └── health.spec.js
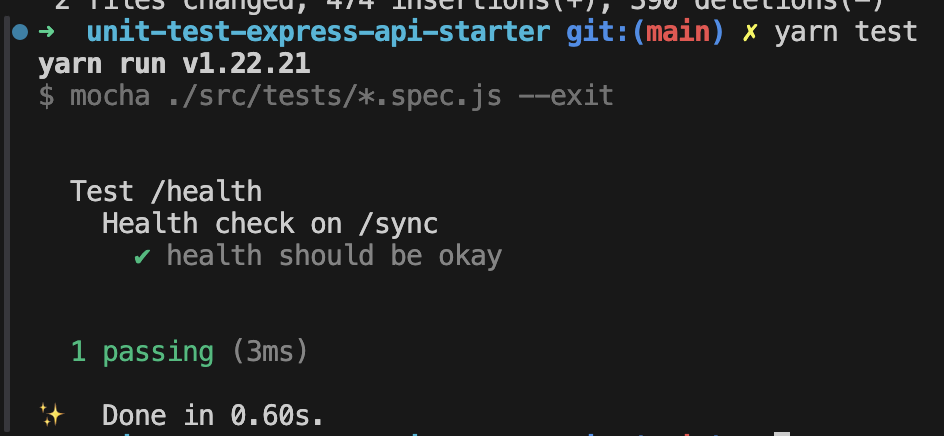
Great! Let's start writing some basic tests for the /health API. The /health endpoint is typically used to check if the server is running and functioning correctly. We'll create tests to ensure that this endpoint responds with the expected status and message.
Now, let's write the tests for this route. Create a new file named health.spec.js inside the tests folder.
// health.spec.js
const chai = require("chai");
const expect = chai.expect;

const { healthCheckSync } = require("../controllers/health.controller");

describe("Test /health", () => {
  describe("Health check on /sync", () => {
    it("health should be okay", () => {
      const actualResult = healthCheckSync();
      expect(actualResult).to.equal("OK");
    });
  });
});
Now, let's try to understand each blocks"
- describe block: Using describe blocks to group related test suites helps organize your tests in a way that mirrors the structure of your application code. This makes your tests easier to manage and understand.
You can add more tests within the nested describe block or create additional nested describe blocks for other related tests.
describe("API Health Check", () => {
  describe("GET /health/sync", () => {});
  describe("GET /health/async", () => {});
});
Splitting your unit tests across different files corresponding to different modules or business logic is a great approach for maintainability. Writing descriptive messages in test suites from a product's perspective can help communicate what the code does more effectively.
- it block: This is where we actually write our test suites and verify assertions, return values, and more.
Running Your First Test
With your initial test suite prepared, you're ready to run it. To execute the tests you've written, add the following line to the scripts section of your package.json file:
"scripts": {
  "test": "mocha ./src/tests/*.spec.js"
}
This script will locate all the files inside the tests folder and execute them using Mocha. To run your test suites, simply use the following command:
yarn run test
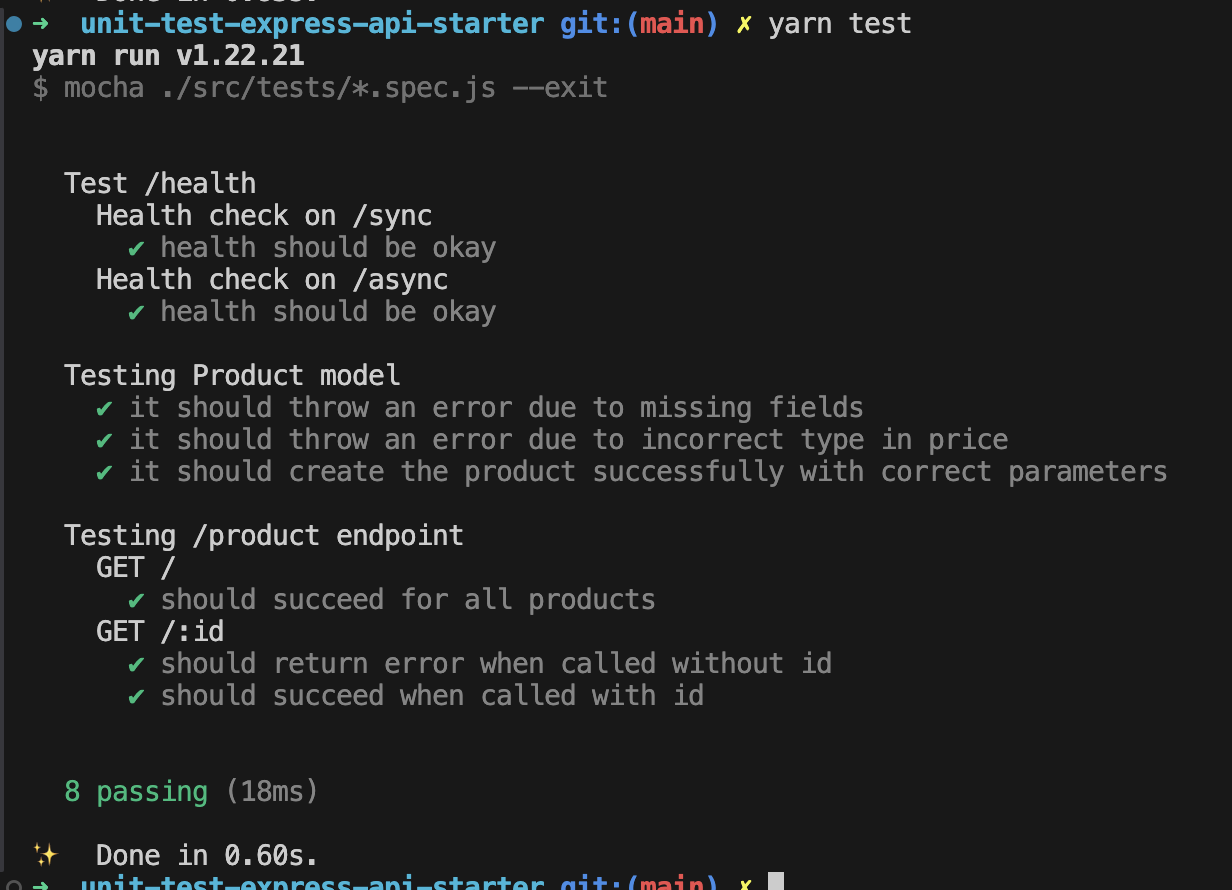
And there you have it—your first test suite is up and running successfully! 🎉
To run Mocha in watch mode, which automatically triggers tests on file changes, you can add a separate test script to your package.json like this:
"scripts": {
  "test:watch": "mocha --watch ./src/tests/*.spec.js"
}
Try async
We will likely need to test asynchronous operations that occur across our Express API. Let's create a test for the /health/async endpoint, which is asynchronous by nature.
// health.spec.js
const chai = require("chai");
const expect = chai.expect;

+ const { healthCheckSync, healthCheckAsync } = require("../controllers/health.controller");

describe("Test /health", () => {
  describe("Health check on /sync", () => {
    it("health should be okay", () => {
      const actualResult = healthCheckSync();
      expect(actualResult).to.equal("OK");
    });
  });

+  describe('Health check on /async', () => {
+    it('health should be okay', async () => {
+      const actualResult = await healthCheckAsync();
+      expect(actualResult).to.equal('OK');
+    });
+  });
});
Mocha provides significant flexibility in handling asynchronous operations in our test suites. We can:
- Utilize
async/awaitas demonstrated earlier, - Attach
thenablesto perform assertions on the results, - Or use the
doneparameter with callbacks to manage the result and perform assertions.
Before and After hooks
We sometimes need to execute setup or teardown code before or after each test suite. For example, we might connect to a database before each suite and disconnect afterward.
In a describe block, Mocha provides the following hooks:
before: Runs once before all tests in thedescribeblock.beforeEach: Runs before each individual test within thedescribeblock.after: Runs once after all tests in thedescribeblock.afterEach: Runs after each individual test within thedescribeblock.
Here’s an example demonstrating these hooks:
// health.spec.js
const chai = require("chai");
const expect = chai.expect;

const { healthCheckSync, healthCheckAsync } = require("../controllers/health.controller");

describe("Test /health", () => {
+  before(() => {
+    console.log('Ran before all the test suites');
+  });
+
+  after(() => {
+    console.log('Ran after all the test suites');
+  });
+
+  beforeEach(() => {
+    console.log('Ran before EACH test suite');
+  });

+  afterEach(() => {
+    console.log('Ran after EACH test suite');
+  });
  describe("Health check on /sync", () => {
    it("health should be okay", () => {
      const actualResult = healthCheckSync();
      expect(actualResult).to.equal("OK");
    });
  });

  describe('Health check on /async', () => {
    it('health should be okay', async () => {
      const actualResult = await healthCheckAsync();
      expect(actualResult).to.equal('OK');
    });
  });
});
After making the above changes this is how our health.spec.js file looks like
const chai = require("chai");
const expect = chai.expect;

const {
  healthCheckSync,
  healthCheckAsync,
} = require("../controllers/health.controller");

describe("Test /health", () => {
  before("before", () => {
    console.log("Ran before all the test suites");
  });

  after("after", () => {
    console.log("Ran after all the test suites");
  });

  beforeEach("beforeEach", () => {
    console.log("Ran before EACH test suite");
  });

  afterEach("afterEach", () => {
    console.log("Ran after EACH test suite");
  });

  describe("Health check on /sync", () => {
    it("health should be okay", () => {
      const actualResult = healthCheckSync();
      expect(actualResult).to.equal("OK");
    });
  });

  describe("Health check on /async", () => {
    it("health should be okay", async () => {
      const actualResult = await healthCheckAsync();
      expect(actualResult).to.equal("OK");
    });
  });
});
Running the above code will produce the following output:
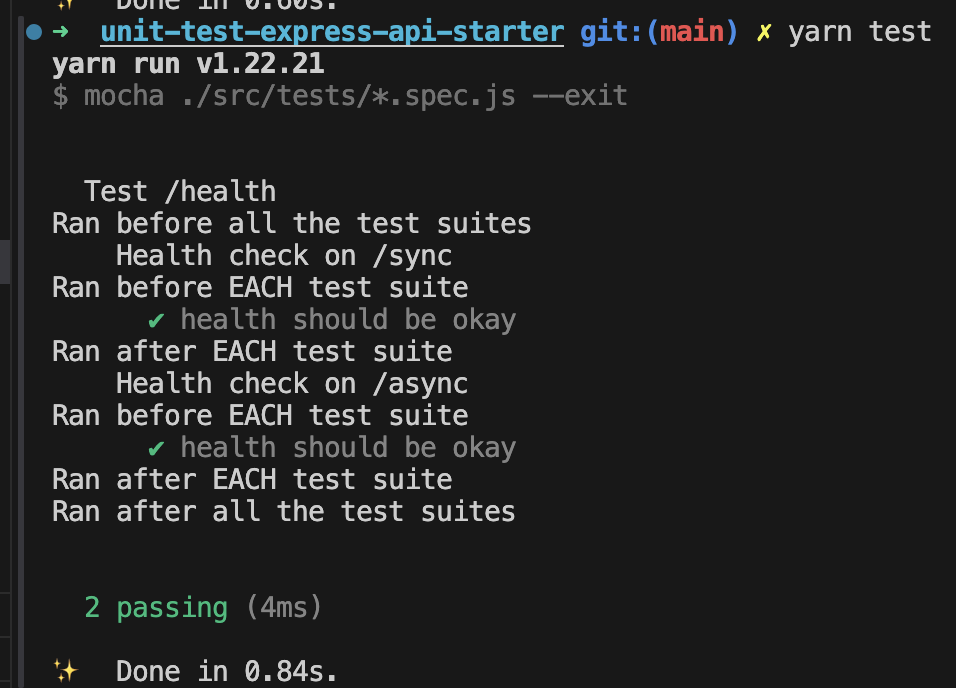
From the output, we can observe the following:
- The
beforeandafterhooks executed at the beginning and end of the outermostdescribeblock. - The
beforeEachandafterEachhooks ran before and after each individual test suite (i.e., eachitblock).
One unit at a time
Unit testing focuses on evaluating a single function in isolation, without involving external components like databases. This approach helps ensure that the function works correctly on its own, without being affected by external factors.
For instance, when testing a function that makes a database call, we don't want to execute the actual database query during testing. Here’s why:
- Isolated Testing: We aim to test the function itself, not the database.
- Avoid False Failures: Issues with the database could lead to test failures unrelated to the function's actual behavior.
To illustrate this, we'll test the fetchProduct function. But first, let's install the necessary dependencies:
npm install -D rewire sinon sinon-chai
- Sinon helps us create stubs, spies, and mocks for any unit testing framework.
- Rewire allows us to replace the original functions with our own through getter and setter functions.
With these dependencies installed, let’s proceed to set up the test suites for the fetchProduct function.
Firstly, create a new file product.spec.js inside tests folder. And add the following base contents.
//product.spec.js
const chai = require("chai");
const expect = chai.expect;
const sinon = require("sinon");
const sinonChai = require("sinon-chai");
chai.use(sinonChai);
const rewire = require("rewire");
const mongoose = require("mongoose");
const sandbox = sinon.createSandbox();
let productController = rewire("../controllers/product.controller");
describe("Testing /product endpoint", () => {
let sampleProductVal;
let findOneStub;
beforeEach(() => {
sampleProductVal = {
name: "sample product",
price: 10,
rating: "5",
};
findOneStub = sandbox
.stub(mongoose.Model, "findOne")
.resolves([sampleProductVal]);
});
afterEach(() => {
productController = rewire("../controllers/product.controller");
sandbox.restore();
});
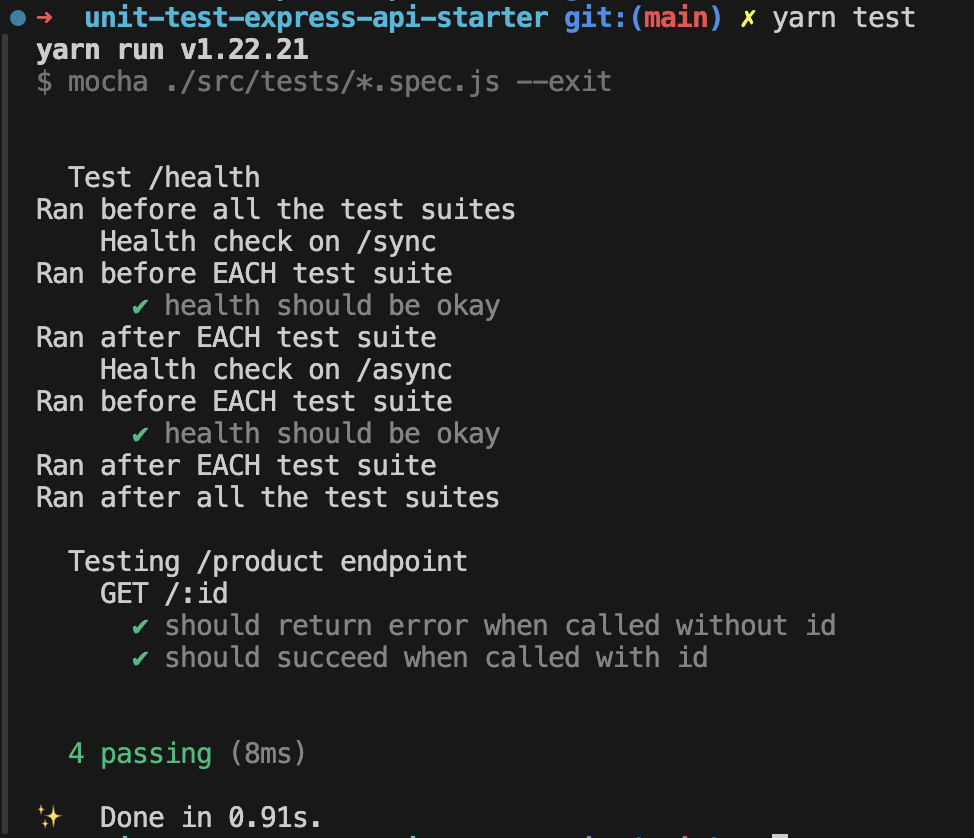
describe("GET /:id", () => {
it("should return error when called without id", async () => {
productController
.fetchProduct()
.then(() => {
throw new Error("Unexpected success!");
})
.catch((err) => {
expect(result).to.be.instanceOf(Error);
expect(err.message).to.equal("Invalid product id");
});
});
it("should succeed when called with id", async () => {
productController
.fetchProduct("someRandomId")
.then((product) => {
expect(product).to.equal(sampleProductVal);
})
.catch((err) => {
throw new Error("Unexpected failure!");
});
});
});
});
Here's a step-by-step breakdown of how we test the fetchProduct function:
-
Stub the
findOneMethod:- In the
beforehook for the/productendpoint, we replace thefindOnemethod of Mongoose with a stub. This prevents actual database calls during testing.
- In the
-
Reset
productController:- After each test suite (
itblock) runs, we restore theproductControllerto its original state to ensure that changes made during tests do not affect other tests.
- After each test suite (
-
Restore the Sandbox:
- In the
afterEachhook, we restore the sandbox to reset any stubs created during the tests. Using a sandbox is a good practice for managing stubs and mocks.
- In the
-
Test Without Id:
- In the first test suite, we call
fetchProductwithout a id. We expect an error and perform an assertion inside thecatchblock to verify this.
- In the first test suite, we call
-
Test With Id:
- In the second test suite, we provide a id, which triggers the stubbed
findOnemethod to returnsampleProductVal. We then make an assertion on this result.
- In the second test suite, we provide a id, which triggers the stubbed
As anticipated, all tests pass smoothly, demonstrating that the function behaves as expected under test conditions.
We’ve successfully tested our fetchProduct function by stubbing out the findOne method of Mongoose. This illustrates a crucial concept in unit testing.
Test one unit at a time. Ensure that your tests do not interact with production resources, such as databases or network APIs. This isolation helps verify that each function performs correctly without external dependencies.
After adding test suites the product.spec.js file looks like:
//product.spec.js
const chai = require("chai");
const expect = chai.expect;

const sinon = require("sinon");
const sinonChai = require("sinon-chai");
chai.use(sinonChai);
const rewire = require("rewire");
const mongoose = require("mongoose");

const sandbox = sinon.createSandbox();

let productController = rewire("../controllers/product.controller");

describe("Testing /product endpoint", () => {
  let sampleProductVal;
  let findStub;
  let findOneStub;
  let updateOneStub;

  beforeEach(() => {
    sampleProductVal = {
      name: "sample product",
      price: 10,
      rating: "5",
    };

    findStub = sandbox
      .stub(mongoose.Model, "find")
      .resolves([sampleProductVal]);
    findOneStub = sandbox
      .stub(mongoose.Model, "findOne")
      .resolves([sampleProductVal]);

    updateOneStub = sandbox
      .stub(mongoose.Model, "updateOne")
      .resolves(sampleProductVal);
  });

  afterEach(() => {
    productController = rewire("../controllers/product.controller");
    sandbox.restore();
  });

  describe("GET /", () => {
    it("should succeed for all products", async () => {
      productController
        .fetchProducts()
        .then((products) => {
          expect(products).to.equal([sampleProductVal]);
        })
        .catch((err) => {
          throw new Error("Unexpected failure!");
        });
    });
  });

  describe("GET /:id", () => {
    it("should return error when called without id", async () => {
      productController
        .fetchProduct()
        .then(() => {
          throw new Error("Unexpected success!");
        })
        .catch((err) => {
          expect(result).to.be.instanceOf(Error);
          expect(err.message).to.equal("Invalid product id");
        });
    });

    it("should return product when called with id", async () => {
      productController
        .fetchProduct("someRandomId")
        .then((product) => {
          expect(product).to.equal(sampleProductVal);
        })
        .catch((err) => {
          throw new Error("Unexpected failure!");
        });
    });
  });

  describe("PUT /:id", () => {
    it("should return error when tried to update without id", async () => {
      productController
        .updateProduct()
        .then(() => {
          throw new Error("Unexpected success!");
        })
        .catch((err) => {
          expect(result).to.be.instanceOf(Error);
          expect(err.message).to.equal("Incomplete arguments");
        });
    });

    it("should be updated when called with id", async () => {
      productController
        .updateProduct("someRandomId", sampleProductVal)
        .then((product) => {
          expect(product).to.equal(sampleProductVal);
        })
        .catch((err) => {
          throw new Error("Unexpected failure!");
        });
    });
  });

  describe("POST /", () => {
    let productModelStub, saveStub, result;

    beforeEach(async () => {
      saveStub = sandbox.stub().returns(sampleProductVal);
      productModelStub = sandbox.stub().returns({
        save: saveStub,
      });

      productController.__set__("Product", productModelStub);
    });

    it("should throw invalid argument error", () => {
      productController
        .createProduct()
        .then(() => {
          throw new Error("⚠️ Unexpected success!");
        })
        .catch((err) => {
          expect(result).to.be.instanceOf(Error);
          expect(err.message).to.equal("Invalid arguments");
        });
    });

    it("should create product successfully", async () => {
      result = await productController.createProduct(sampleProductVal);
      expect(productModelStub).to.have.been.calledWithNew;
      expect(productModelStub).to.have.been.calledWith(sampleProductVal);
      expect(saveStub).to.have.been.called;
      expect(result).to.equal(sampleProductVal);
    });
  });
});
Testing our database
We typically impose constraints on our models when creating schemas to ensure data consistency and adherence to specific characteristics.
Here's an example of our product schema:
const mongoose = require("mongoose");
const Schema = mongoose.Schema;

const productSchema = new Schema({
  name: {
    type: String,
    required: true,
  },
  rating: {
    type: String,
    required: true,
  },
  price: {
    type: Number,
    required: true,
  },
});

module.exports = mongoose.model("Product", productSchema);
Let's create a new file named model.spec.js in our tests folder to perform some basic checks on our model, ensuring it adheres to the defined constraints:
model.spec.js file
const chai = require("chai");
const expect = chai.expect;
const mongoose = require("mongoose");
const ValidationError = mongoose.Error.ValidationError;

var Product = require("../models/Product.model");

describe("Testing Product model", () => {
  let sampleProductVal;

  beforeEach(() => {
    sampleProductVal = {
      name: "sample product",
      price: "10",
      rating: "5",
    };
  });

  it("it should throw an error due to missing fields", async (done) => {
    let product = new Product();
    const validations = product.validateSync();
    expect(validations.errors.name).to.exist;
    expect(validations.errors.rating).to.exist;
    expect(validations.errors.price).to.exist;
    done();
  });

  it("it should throw an error due to incorrect type in price", async (done) => {
    let product = new Product(sampleProductVal);
    const validations = product.validateSync();
    expect(validations.errors.price).to.exist;
    done();
  });

  it("it should create the product successfully with correct parameters", (done) => {
    let product = new Product({
      ...sampleProductVal,
      price: 5,
    });

    const validations = product.validateSync();
    expect(validations).to.be.undefined;
    expect(product.price).to.equal(5);
    done();
  });
});
In this test suite, we have:
-
Checked for Missing Fields:
- Validates that an error is thrown if required fields are missing.
-
Checked for Incorrect type of Price field:
- Validates that an error is thrown if the type of price is string. Expected number.
-
Checked Successful Creation:
- Validates that the product is created successfully when all parameters are correct.
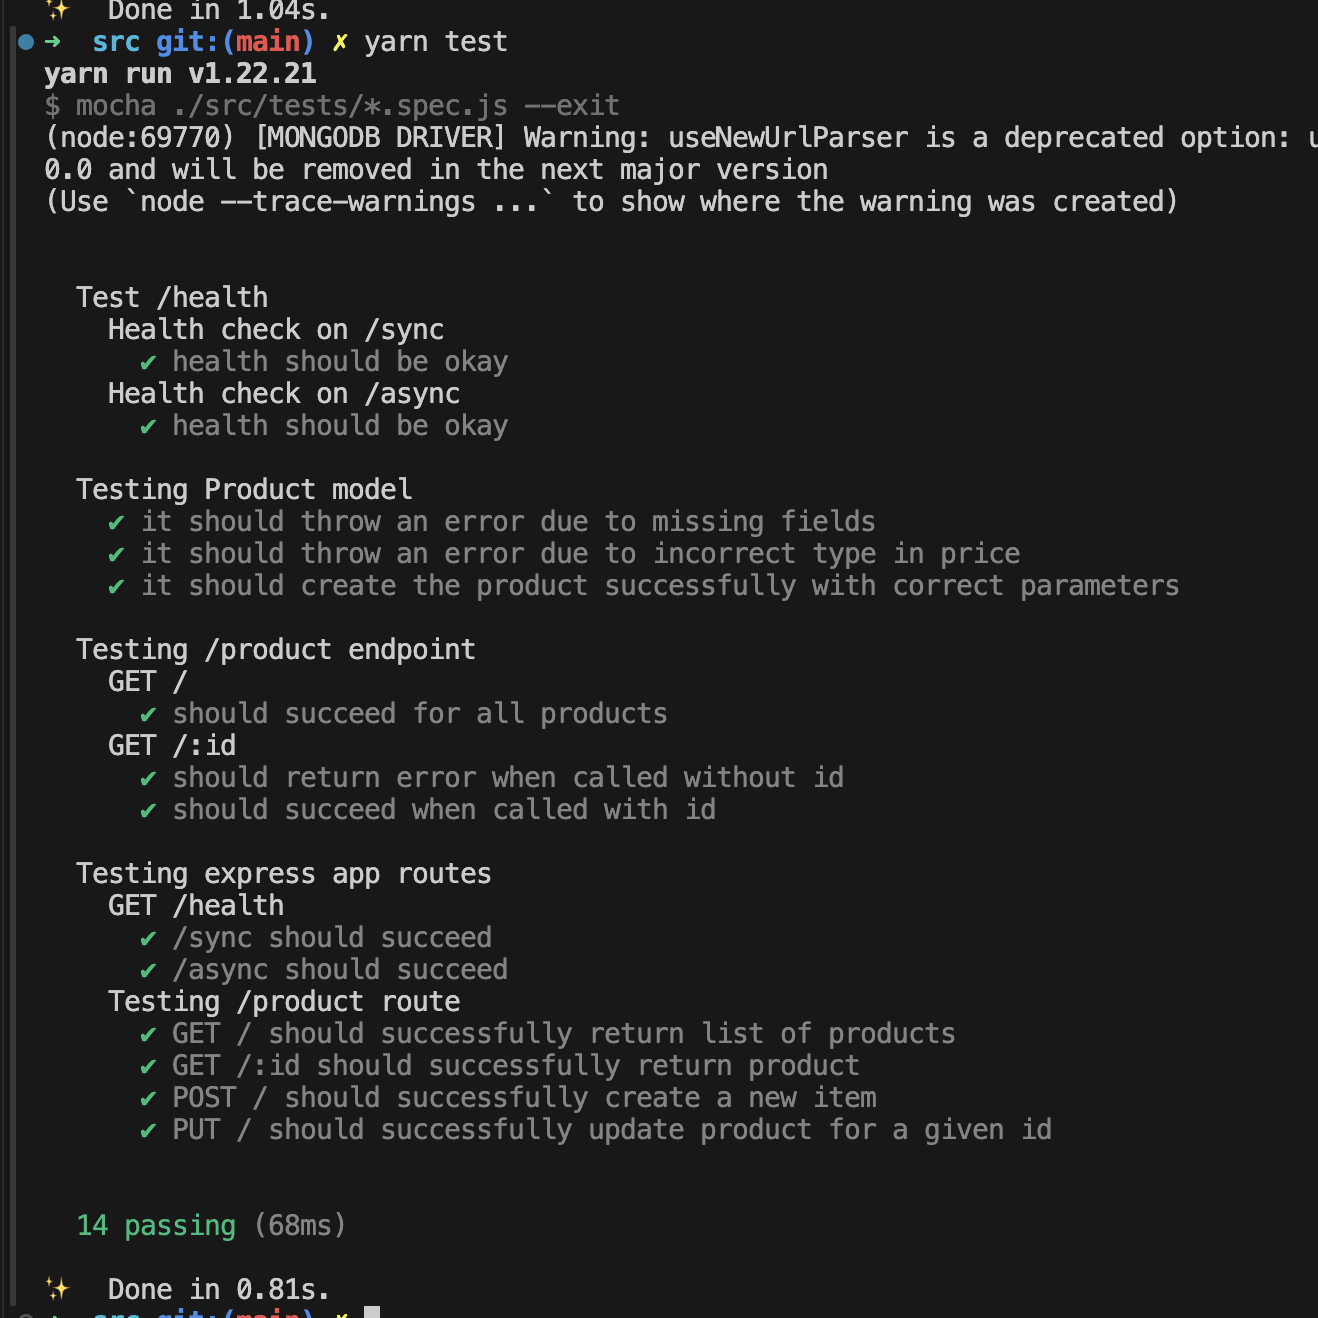
All tests pass successfully 🎉, confirming that the product model behaves as expected.
Testing our routes
Finally, let's test the routes of our Express app. We'll create a new file named routes.spec.js inside our tests folder.
For reference, here's how the final project structure looks:
.
├── app.js
├── controllers
│   ├── health.controller.js
│   └── product.controller.js
├── models
│   └── Product.model.js
├── routes
│   ├── health.route.js
│   ├── index.js
│   └── product.route.js
└── tests
    ├── health.spec.js
    ├── model.spec.js
    ├── product.spec.js
    └── routes.spec.js
The next step is to install the supertest package from npm. This tool simplifies and cleans up the process of testing HTTP requests.
To install supertest, run:
yarn add -D supertest
Once the installation is complete, you're ready to add tests for your routes. Here’s how you can extend the routes.spec.js file with some tests:
const chai = require("chai");
const expect = chai.expect;
const sinon = require("sinon");
const sinonChai = require("sinon-chai");
chai.use(sinonChai);
const rewire = require("rewire");
const request = require("supertest");

const healthCheckController = require("../controllers/health.controller");
const productController = require("../controllers/product.controller");

const sandbox = sinon.createSandbox();

let app = rewire("../app");

describe("Testing express app routes", () => {
  afterEach(() => {
    app = rewire("../app");
    sandbox.restore();
  });

  describe("GET /health", () => {
    beforeEach(() => {
      sandbox.stub(healthCheckController, "healthCheckSync").returns("OK");
      sandbox.stub(healthCheckController, "healthCheckAsync").resolves("OK");
    });

    it("/sync should succeed", (done) => {
      request(app)
        .get("/health/sync")
        .expect(200)
        .end((err, response) => {
          expect(response.body).to.have.property("health").to.equal("OK");
          done(err);
        });
    });

    it("/async should succeed", (done) => {
      request(app)
        .get("/health/async")
        .expect(200)
        .end((err, response) => {
          expect(response.body).to.have.property("health").to.equal("OK");
          done(err);
        });
    });
  });

  describe("Testing /product route", () => {
    let sampleProductVal, id;

    beforeEach(() => {
      id = "1234567891";
      sampleProductVal = {
        name: "sample product",
        price: 10,
        rating: "5",
      };
      sandbox
        .stub(productController, "fetchProducts")
        .resolves([sampleProductVal]);
      sandbox
        .stub(productController, "fetchProduct")
        .resolves(sampleProductVal);
      sandbox
        .stub(productController, "createProduct")
        .resolves(sampleProductVal);
      sandbox
        .stub(productController, "updateProduct")
        .resolves(sampleProductVal);
    });

    it("GET / should successfully return list of products", (done) => {
      request(app)
        .get(`/product/`)
        .expect(200)
        .end((err, response) => {
          expect(response.body)
            .to.have.property("message")
            .to.equal("Products fetch successfully!");
          expect(response.body)
            .to.have.property("products")
            .and.to.be.an.instanceof(Array)
            .and.to.have.property(0)
            .that.includes.all.keys(["name", "price", "rating"]);
          done(err);
        });
    });

    it("GET /:id should successfully return product", (done) => {
      request(app)
        .get(`/product/${id}`)
        .expect(200)
        .end((err, response) => {
          expect(response.body)
            .to.have.property("message")
            .to.equal("Product fetch successfully!");
          expect(response.body)
            .to.have.property("product")
            .to.have.property("name")
            .to.equal("sample product");
          expect(response.body)
            .to.have.property("product")
            .to.have.property("price")
            .to.equal(10);
          expect(response.body)
            .to.have.property("product")
            .to.have.property("rating")
            .to.equal("5");
          done(err);
        });
    });

    it("POST / should successfully create a new product", (done) => {
      request(app)
        .post("/product/")
        .send(sampleProductVal)
        .expect(200)
        .end((err, response) => {
          expect(response.body)
            .to.have.property("message")
            .to.equal("Product created successfully!");
          expect(response.body)
            .to.have.property("product")
            .to.have.property("name")
            .to.equal("sample product");
          expect(response.body)
            .to.have.property("product")
            .to.have.property("price")
            .to.equal(10);
          expect(response.body)
            .to.have.property("product")
            .to.have.property("rating")
            .to.equal("5");
          done(err);
        });
    });

    it("PUT / should successfully update product for a given id", (done) => {
      request(app)
        .put(`/product/${id}`)
        .send(id)
        .expect(200)
        .end((err, response) => {
          expect(response.body)
            .to.have.property("message")
            .to.equal("Product updated successfully!");
          expect(response.body)
            .to.have.property("product")
            .to.have.property("name")
            .to.equal("sample product");
          expect(response.body)
            .to.have.property("product")
            .to.have.property("price")
            .to.equal(10);
          expect(response.body)
            .to.have.property("product")
            .to.have.property("rating")
            .to.equal("5");
          done(err);
        });
    });
  });
});
The process follows a structure similar to what we've used so far. Essentially, we are:
- Stubbing the Controllers: This allows us to focus on testing the routes directly, as we've already tested the controllers separately.
- Making Requests with
supertestand Asserting Responses: We usesupertestto simulate HTTP requests and check that the responses match our expectations.
Before running your tests, ensure that your test script includes the --exit flag to handle cases where Mocha doesn't automatically exit. Update your package.json test script as follows:
"scripts": {
  "test": "mocha ./src/tests/*.spec.js --exit "
}
This flag ensures that Mocha exits after all tests are complete, which is useful for resolving issues related to hanging tests or open handles.
Check your coverage
Code coverage measures the percentage of your code that is covered by tests. Now that we've written our tests, it would be helpful to see the coverage of our unit tests.
Code coverage can significantly impact developer confidence, but it's important to note that achieving 100% coverage doesn't necessarily mean your code is flawless.
- Code Coverage: Indicates the percentage of your code covered by tests.
- Limitations: It doesn't guarantee that all possible scenarios are covered by the tests.
To implement code coverage in your project, you can use tools like nyc (Istanbul CLI). Here's how you can set it up:
yarn add -D nyc
Next, let's add the following script to the package.json file:
"scripts": {
  "coverage": "nyc --reporter=text npm test"
}
And we're done! You can now run the coverage script with npm run coverage and see the coverage report in the terminal.
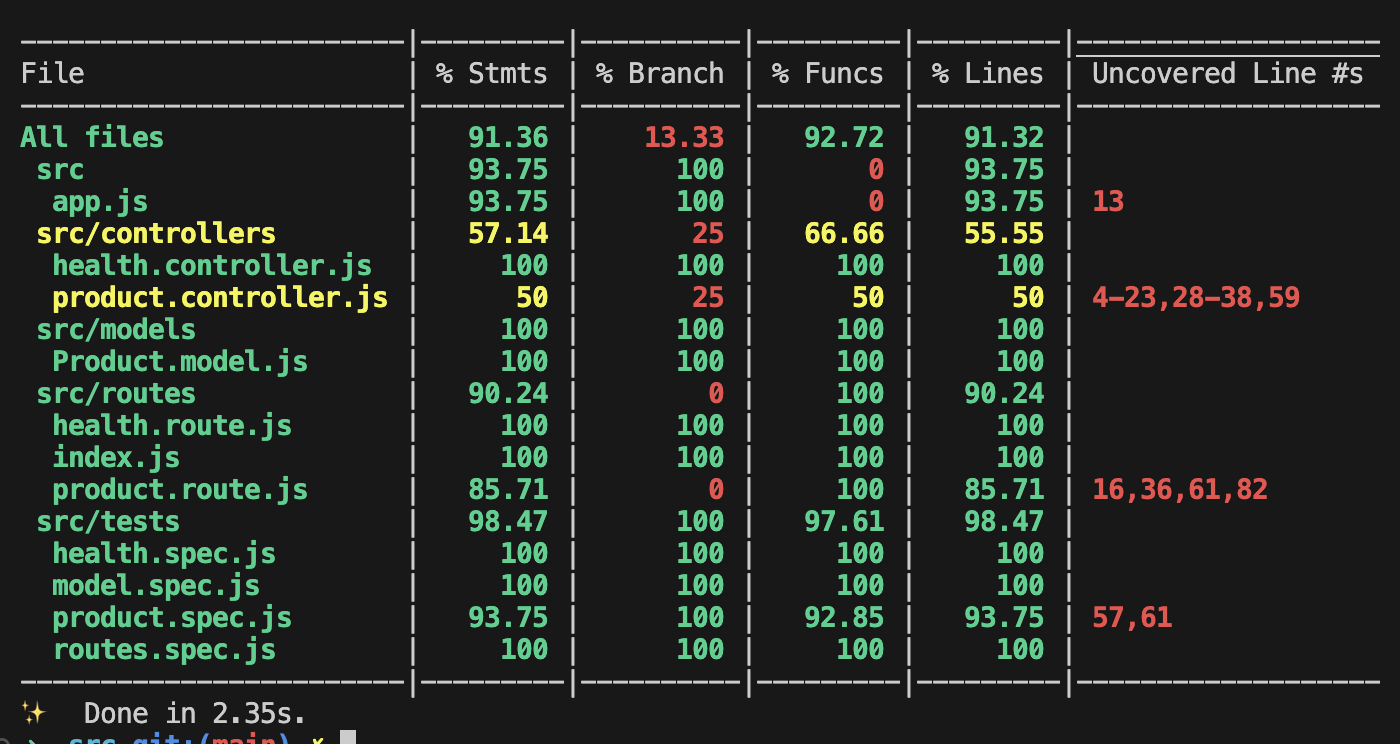
Columns Explanation
- File: The name of the file or directory being tested.
- % Stmts (Statements): The percentage of executable statements that are covered by tests.
- % Branch (Branches): The percentage of branches (like
ifstatements or switch cases) that are covered by tests. - % Funcs (Functions): The percentage of functions that are covered by tests.
- % Lines: The percentage of lines of code that are covered by tests.
- Uncovered Line #s: Specific line numbers that are not covered by tests.
Resources
Here are some valuable resources to help you with unit testing and related tasks:
-
Unit Test Library Documentation:
- Mocha: Mocha is a feature-rich JavaScript test framework running on Node.js and in the browser, making asynchronous testing simple and fun.
-
Assertion Library:
- Chai: Chai is an assertion library with a lot of plugins worth exploring. It provides different styles of assertions such as BDD and TDD.
-
Test Spies, Stubs, and Mocks:
- Sinon: Sinon is a standalone test spies, stubs, and mocks for JavaScript. It works with any unit testing framework.
-
HTTP Assertions Library:
- Supertest: Supertest is used to test HTTP assertions, making it easy and clean to test HTTP requests.
-
Monkey Patching for Private Functions and Variables:
- Rewire: Rewire allows you to monkey patch your JavaScript modules to access private functions and variables.
-
Code Coverage:
- Nyc: Nyc is a code coverage tool that works with many testing frameworks to provide a detailed coverage report.
-
Express.js API Used in This Article:
- Unit-test-express-api: The GitHub repository containing the Express.js API code used in this article.
Drawbacks of Unit Testing
While unit testing offers numerous benefits and adopting Test Driven Development (TDD) can significantly improve the reliability of your application, it also comes with some trade-offs. Let's take a look at some of the drawbacks:
-
Cannot Replace Integration and End-to-End Testing:
- Unit tests focus on individual components in isolation and cannot ensure that all components work together seamlessly. Integration tests and end-to-end tests are necessary to verify the interaction between different parts of the application.
-
Incomplete Coverage of Scenarios and Edge Cases:
- Unit tests often fail to cover all possible scenarios and edge cases. Even with comprehensive unit tests, there might be unexpected situations that are only revealed through more extensive testing approaches.
-
Impact on Development Speed:
- Adopting TDD or writing unit tests for all possible scenarios can enhance reliability but may also slow down the development process. The time spent writing and maintaining tests could be significant, especially in fast-paced development environments.
Understanding these drawbacks is essential for balancing the benefits of unit testing with the practical constraints of your development process. Effective testing strategies typically include a combination of unit, integration, and end-to-end tests to ensure comprehensive coverage and reliability.
Learn More
- A practical guide to data collection with OpenTelemetry, Prometheus and Grafana
- Beginner's Guide to HTTP Methods and Status Codes
- Flask and SQLAlchemy: Better Data Management
Please let me know if there's anything else I can add or if there's any way to improve the post. Also, leave a comment if you have any feedback or suggestions.
Discussions