
In this blog we will explore all the new Bun 1.0 and build a TODO app using Bun, HTMX and Pico.
What is Bun
Bun is a fast, all-in-one toolkit for running, building, testing, and debugging JavaScript and TypeScript, from a single file to a full-stack application. Today, Bun is stable and production-ready.
Installing Bun
The first thing we would need to initialize a TODO app is Bun. Let's install Bun, installing Bun is pretty simple. Copy the command below and run in your terminal.
$ curl -fsSL https://bun.sh/install | bash
After running the command mentioned above, let's confirm if the Bun is installed successfylly. To verify the successful installation, run the command mentioned below.
$ bun -v
You should get 1.0.0 or the latest version of Bun.
Now, we have successfully installed Bun, now it's time to initialize our TODO app.
Initializing TODO app
First of all, let's create a new folder bun-todo, it is were we will write our code and develop our TODO application. And move into the newly created folder as mentioned below.
$ mkdir bun-todo

$ cd bun-todo
Now, inside bun-todo folder lets us initialize our TODO app. To initialize run bun init in your terminal and follow the prompt.
$ bun init
Update the entry point to be index.tsx and you can skip the rest.
package name (bun-todo):
entry point (index.ts): index.tsx
Up until now, our files and folder structure should look as shown below
.
├── README.md
├── bun.lockb
├── index.tsx
├── node_modules/
├── package.json
└── tsconfig.json
-
README.md:
This is a markdown file that serves as the documentation for your project. It typically contains information about what the project does, how to install and use it, and any other relevant details.
-
bun.lockb:
This file is equivalent to
yarn.lockandpackage-lock.json. It is in the format of binary and it is not readable by human. -
index.tsx:
This file will serve as the entry point for our TODO application.
-
node_modules/:
This is a directory that typically contains all the dependencies (external libraries or modules) that our project relies on.
-
package.json:
This is a crucial file in Bun projects. It contains metadata about the project, including its name, version, description, main file, dependencies, and other important information. It also specifies the scripts that can be run as part of the project.
-
tsconfig.json:
This file is used to configure the TypeScript compiler. It defines how TypeScript should compile your project.
Update package.json file
Now, let us update our package.json file, let's add a script entry, as highlighted below.
{
  "name": "bun-todo",
  "module": "index.ts",
  "type": "module",
  "scripts": {
    "dev": "bun --hot run index.tsx"
  },
  "devDependencies": {
    "bun-types": "latest"
  },
  "peerDependencies": {
    "typescript": "^5.0.0"
  }
}
So, if we want to run our TODO app we can now simply run bun run dev. So, the --hot wil hot reload our TODO app whenever we make any changes in our code.
So far, we have initialised our TODO app using, bun. Now it's time to add out index.html. It is where our UI will lies.
Adding index.html
In the root folder of our TODO app, create a new file index.html and add the following contents.
<!DOCTYPE html>
<html lang="en" data-theme="light">
  <head>
    <meta charset="UTF-8" />
    <meta name="viewport" content="width=device-width, initial-scale=1.0" />
    <title>Bun Todo</title>
  </head>

  <body>
    <header class="container">
      <hgroup>
        <h1>Bun 1.0 Demo</h1>
        <h2>
          Tutorial by
          <a href="https://youtube.com/@learnpratap">Learn with Pratap</a>
        </h2>
      </hgroup>
    </header>

    <main class="container">
      <form>
        <label for="todo">Bun Todo</label>
        <input
          id="todo"
          name="todo"
          type="text"
          aria-label="Create Bun Todo"
          placeholder="New Bun todo"
        />
        <button type="submit">Create Bun</button>
      </form>

      <section id="todos">
        <!-- This is where our TODO list will be listed -->
      </section>
    </main>
  </body>
</html>
We have added form element which has input in it and a section element where we will populate all our todos.
Now let us update our index.html to have the requirements of HTMX, and Pico.
HTMX: htmx is a library that allows you to access modern browser features directly from HTML, rather than using javascript.
Pico: Minimal CSS Framework for semantic HTML
Update the change as highlighted below.
<!DOCTYPE html>
<html lang="en" data-theme="light">
  <head>
    <meta charset="UTF-8" />
    <meta name="viewport" content="width=device-width, initial-scale=1.0" />
    <script src="https://unpkg.com/htmx.org@1.9.5"></script>
    <script src="https://unpkg.com/hyperscript.org@0.9.11"></script>
    <script src="https://unpkg.com/htmx.org/dist/ext/json-enc.js"></script>
    <link
      rel="stylesheet"
      href="https://cdn.jsdelivr.net/npm/@picocss/pico@1/css/pico.min.css"
    />
    <title>Bun Todo</title>
  </head>

  <body>
    <header class="container">
      <hgroup>
        <h1>Bun 1.0 Demo</h1>
        <h2>
          Tutorial by
          <a href="https://youtube.com/@learnpratap">Learn with Pratap</a>
        </h2>
      </hgroup>
    </header>

    <main class="container">
      <form>
        <label for="todo">Bun Todo</label>
        <input
          id="todo"
          name="todo"
          type="text"
          aria-label="Create Bun Todo"
          placeholder="New Bun todo"
        />
        <button type="submit">Create Bun</button>
      </form>

      <section id="todos">
        <!-- This is where our TODO list will be listed -->
      </section>
    </main>
  </body>
</html>
So far, we have added our dependencies related to HTMX and Pico.
As of now we have added our basic UI, which does nothing yet. Before we make any changes to the index.html file let's create a server using Bun.
Initializing Bun server
Now, it's finally time to create a server. Creating a server using Bun is very simple. Inside the file index.tsx remove the existing content and add the following code.
const server = Bun.serve({
  hostname: "localhost",
  port: 3000,
  fetch: fetchHandler,
});

console.log(`Bun Todo running on ${server.hostname}:${server.port}`);

async function fetchHandler(request: Request): Promise<Response> {
  return new Response(Bun.file("index.html"));
}
This is all it takes to create a server using Bun. Bun.serve() creates a server with the provided configurations. Our TODO application is ready to listen the server at http://localhost:3000. Which means, whenever we hit the url http://localhost:3000 from our browser, it will be handled by the fetchHandler() function. Basically the fetch handler handles incoming requests. It receives a Request object and returns a Response or Promise<Response>.
So let us now run our server and see what we have built so far. To run the application, run the command mentioned below in the terminal from the root folder, bun-todo in our case.
$ bun run dev
After running the command above, we should be able to see our UI in http://localhost:3000. This is how it should look like.
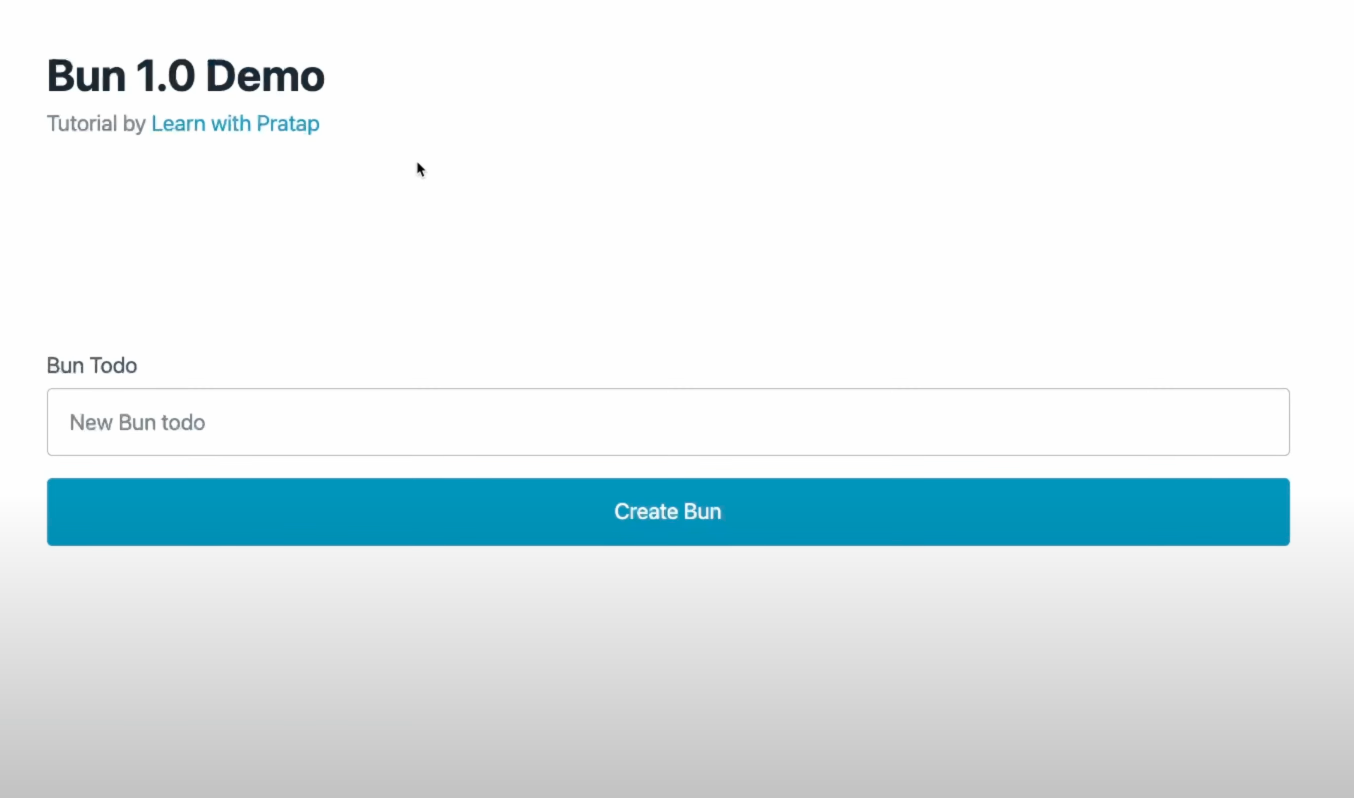
Amazing, I hope you are following along so far. Now let us create a todo variable and type. For now it will be an empty list. Add the following code in index.tsx about the fetchHandler() function.
const server = Bun.serve({
  hostname: "localhost",
  port: 3000,
  fetch: fetchHandler,
});

console.log(`Bun Todo running on ${server.hostname}:${server.port}`);

type Todo = { id: number; name: string };
const todos: Todo[] = [];

async function fetchHandler(request: Request): Promise<Response> {
  return new Response(Bun.file("index.html"));
}
Also, let's handle the incoming request. We will return index.html only if the url path is "/" or "". If it doesn't match the path then we will response with 404. This is pretty simple. Update the fetchHandler() such that it looks like this.
// above code same as before
async function fetchHandler(request: Request): Promise<Response> {
  const url = new URL(request.url);

  if (url.pathname === "" || url.pathname === "/") {
    return new Response(Bun.file("index.html"));
  }

  return new Response("Not Found", { status: 404 });
}
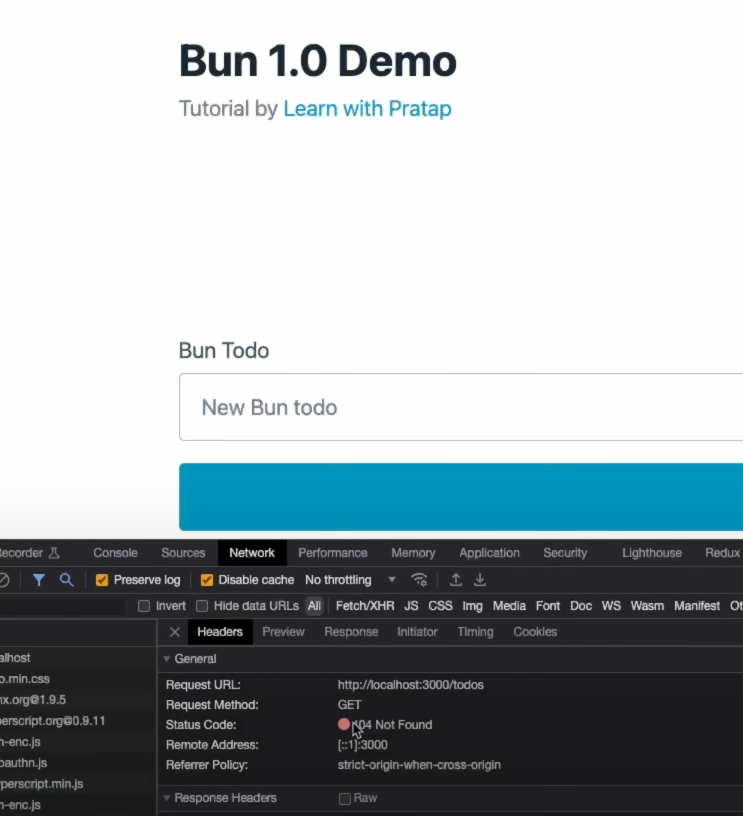
So, far we have validated our paths. Now, lets us update our index.html, so that when we load our UI we get a list of todos. Let's add hx-get="/todos" hx-trigger="load", in our section element as below.
<!-- Above code same  as before-->
<section id="todos" hx-get="/todos" hx-trigger="load"></section>
<!-- below code same  as before-->
The properties hx-get and hx-trigger are HTMX properties. It means that make a GET request to /todos when the section element is loaded. Since the UI will make a GET request to our server http://localhost:3000/todos, as the request to /todos is not handled by our server it will return a response of 404.
Before we handle the path, let's add few dependencies which are required to render our React component.
This is a simple demonstrations of how we can use React and Server in the same file.
To add the dependencies, in your terminal run:
$ bun add -D react react-dom @types/react @types/react-dom
Please note we have added as a dev dependencies.
So now it's finally time to update our index.tsx so that we can render a React component. Let us add a React compoent TodoList.
On the bottom of index.tsx add the following code. Basically it is a React Component and it is pretty straight forward.
// above code same as before
function TodoList(props: { todos: Todo[] }) {
  return (
    <ul>
      {props.todos.length
        ? props.todos.map((todo) => (
            <li key={`todo-${todo.id}`}>{todo.name}</li>
          ))
        : "No todos found"}
    </ul>
  );
}
This is how our index.tsx file looks like so far.
const server = Bun.serve({
  hostname: "localhost",
  port: 3000,
  fetch: fetchHandler,
});

console.log(`Bun Todo running on ${server.hostname}:${server.port}`);

type Todo = { id: number; name: string };
const todos: Todo[] = [];

async function fetchHandler(request: Request): Promise<Response> {
  const url = new URL(request.url);

  if (url.pathname === "" || url.pathname === "/") {
    return new Response(Bun.file("index.html"));
  }

  return new Response("Not Found", { status: 404 });
}

function TodoList(props: { todos: Todo[] }) {
  return (
    <ul>
      {props.todos.length
        ? props.todos.map((todo) => (
            <li key={`todo-${todo.id}`}>{todo.name}</li>
          ))
        : "No todos found"}
    </ul>
  );
}
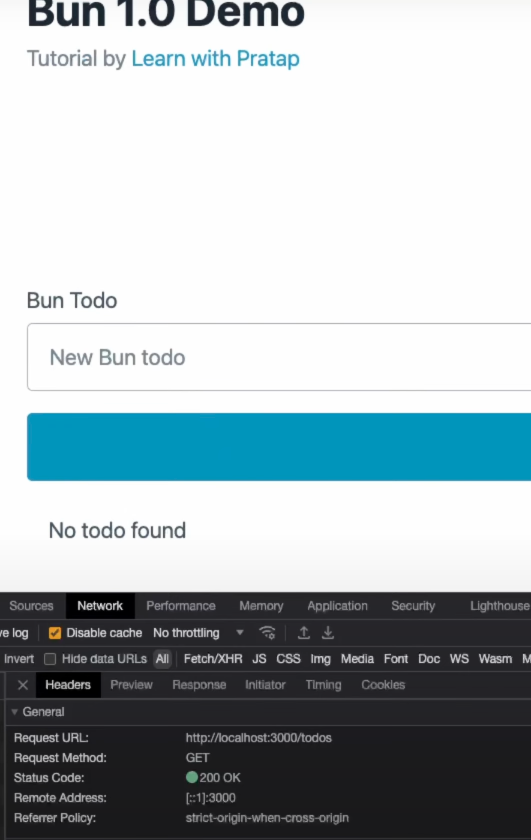
Now, to handle GET http://localhost:3000/todos, let us update our index.tsx to contain the following code inside the fetchHandler().
// Adding import
import { renderToString } from "react-dom/server";
// below code same as before

// above code same as before
async function fetchHandler(request: Request): Promise<Response> {
  const url = new URL(request.url);

  if (url.pathname === "" || url.pathname === "/") {
    return new Response(Bun.file("index.html"));
  }

  if (url.pathname === "/todos" && request.method === "GET") {
    return new Response(renderToString(<TodoList todos={todos} />));
  }

  return new Response("Not Found", { status: 404 });
}
// below code same as before
After having the changes above, refresh the browser http://localhost:3000 and now the error while fetching GET http://localhost:3000/todos should be gone now.
Now, it's finally time to update index.html, so that we can handle our form element. Let's update the form element to have these HTMX properties.
<form
  hx-post="/todos"
  hx-target="#todos"
  hx-ext="json-enc"
  _="on submit target.reset()"
>
  <label for="todo">Bun Todo</label>
  <input
    id="todo"
    name="todo"
    type="text"
    aria-label="Create Bun Todo"
    placeholder="New Bun todo"
  />
  <button type="submit">Create Bun</button>
</form>
hx-post="/todos": This will make aPOST http://localhost:3000/todosrequest to our server.hx-target="#todos": The response from thePOST /todoswill be populated in the HTML element which has the id #todos, basically, section element.hx-ext="json-enc": It will convert the input to JSON.{todo:"the value from input"}_="on submit target.reset()": It will rest the input filed. It will clear the field.
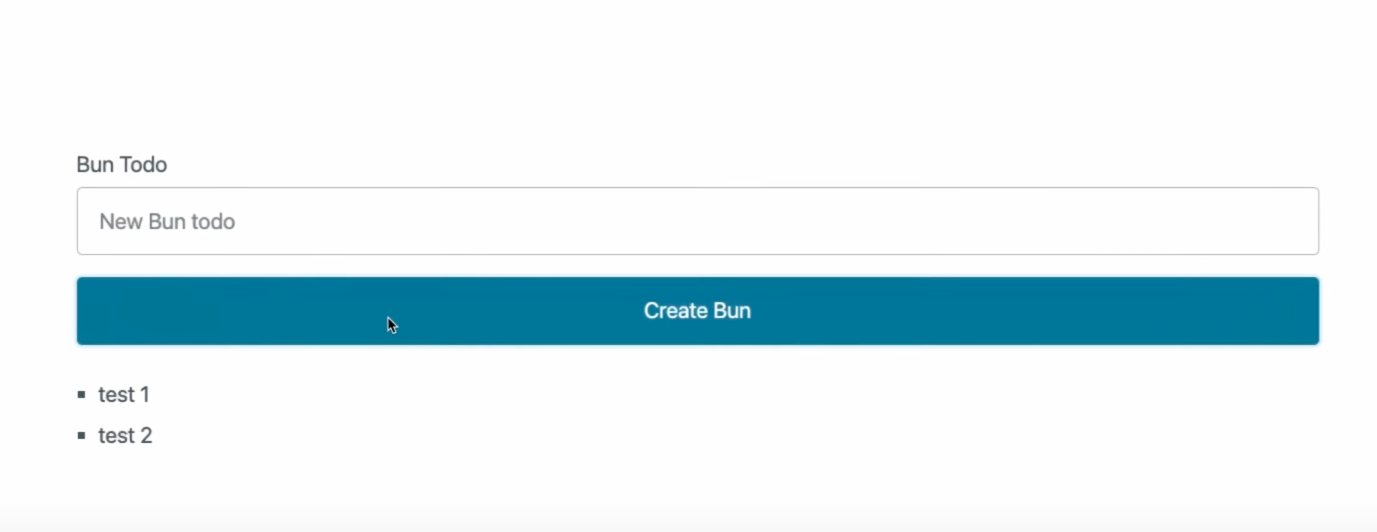
With this we have completed our UI part, but we are yet to handle our POST http://localhost:3000/todos request in our server. This is simple, let's add the code below in our index.tsx inside the fetchHandler() function.
async function fetchHandler(request: Request): Promise<Response> {
  const url = new URL(request.url);

  // same as previous

  // new
  if (url.pathname === "/todos" && request.method === "POST") {
    const { todo } = await request.json();
    todos.push({
      id: todos.length + 1,
      name: todo,
    });
    return new Response(renderToString(<TodoList todos={todos} />));
  }

  // Same.
  return new Response("Not Found", { status: 404 });
}
So, whenever we get a POST http://localhost:3000/todos request, we will add the new todo which we get from our request to our todos list and return the updated TodoList. HTMX is clever enough to handle the response, it will update the section element with the new updated todos.
By now, our code should look like:
<!-- index.html -->

<!DOCTYPE html>
<html lang="en" data-theme="light">
  <head>
    <meta charset="UTF-8" />
    <meta name="viewport" content="width=device-width, initial-scale=1.0" />
    <script src="https://unpkg.com/htmx.org@1.9.5"></script>
    <script src="https://unpkg.com/hyperscript.org@0.9.11"></script>
    <script src="https://unpkg.com/htmx.org/dist/ext/json-enc.js"></script>
    <link
      rel="stylesheet"
      href="https://cdn.jsdelivr.net/npm/@picocss/pico@1/css/pico.min.css"
    />
    <title>Bun Todo</title>
  </head>

  <body>
    <header class="container">
      <hgroup>
        <h1>Bun 1.0 Demo</h1>
        <h2>
          Tutorial by
          <a href="https://youtube.com/@learnpratap">Learn with Pratap</a>
        </h2>
      </hgroup>
    </header>

    <main class="container">
      <form
        hx-post="/todos"
        hx-target="#todos"
        hx-ext="json-enc"
        _="on submit target.reset()"
      >
        <label for="todo">Bun Todo</label>
        <input
          id="todo"
          name="todo"
          type="text"
          aria-label="Create Bun Todo"
          placeholder="New Bun todo"
        />
        <button type="submit">Create Bun</button>
      </form>

      <section id="todos" hx-get="/todos" hx-trigger="load"></section>
    </main>
  </body>
</html>
// index.tsx
import { renderToString } from "react-dom/server";

const server = Bun.serve({
  hostname: "localhost",
  port: 3000,
  fetch: fetchHandler,
});

console.log(`Bun Todo running on ${server.hostname}:${server.port}`);

type Todo = { id: number; name: string };
const todos: Todo[] = [];

async function fetchHandler(request: Request): Promise<Response> {
  const url = new URL(request.url);

  if (url.pathname === "" || url.pathname === "/") {
    return new Response(Bun.file("index.html"));
  }

  if (url.pathname === "/todos" && request.method === "GET") {
    return new Response(renderToString(<TodoList todos={todos} />));
  }

  if (url.pathname === "/todos" && request.method === "POST") {
    const { todo } = await request.json();
    todos.push({
      id: todos.length + 1,
      name: todo,
    });
    return new Response(renderToString(<TodoList todos={todos} />));
  }

  return new Response("Not Found", { status: 404 });
}

function TodoList(props: { todos: Todo[] }) {
  return (
    <ul>
      {props.todos.length
        ? props.todos.map((todo) => (
            <li key={`todo-${todo.id}`}>{todo.name}</li>
          ))
        : "No todos found"}
    </ul>
  );
}
By now, our TODO application is functional, We can now add TODOs. So it is pretty simple to work with Bun, HTMX and Pico.
It's time to test the application.
In the future section, we will use
bun:sqlitemodule to add our todos in the database.
A complete source code can be found here
Conclusion
In conclusion, we have successfully set up a TODO application using Bun 1.0, HTMX, and Pico. We started by installing Bun and initializing our project. Then, we added a basic UI with a form to create new TODO items. We integrated React to render the TODO list and added server-side logic to handle GET and POST requests. Finally, we tested the application and verified that it functions as expected.
In the future, we can explore further enhancements, such as integrating a database (using bun:sqlite) to store TODO items persistently. This would allow us to have a fully functional TODO app with data persistence.
Overall, this tutorial provides a good starting point for building web applications using Bun, a minimalistic JavaScript runtime, and leveraging libraries like HTMX for seamless client-server interactions and React for dynamic UI rendering.
Learn More
- A practical guide to data collection with OpenTelemetry, Prometheus and Grafana
- Beginner's Guide to HTTP Methods and Status Codes
- Flask and SQLAlchemy: Better Data Management
Please let me know if there's anything else I can add or if there's any way to improve the post. Also, leave a comment if you have any feedback or suggestions.
Discussions